Best Weapons in The Blood of Dawnwalker: What To Use Day And Night
How to choose weapons in The Blood of Dawnwalker: the real card stats, the blades worth your denarius, why swords carry both forms, and what does not exist.
FAQ
Do I need a separate weapon for vampires in The Blood of Dawnwalker?
What is the single best weapon in the game?
Is a faster weapon or a harder-hitting weapon better here?
Can you upgrade weapons in The Blood of Dawnwalker?
What Is The Best Weapon In The Blood of Dawnwalker?
The honest answer is not a weapon name — it is a shape. The best loadout in The Blood of Dawnwalker is one sword you keep paying to upgrade, plus the vampire claws you get for free at night. Daytime Coen is human: sword plus Witchcraft. Nighttime Coen is a vampire: claws, and a sword only when an ability needs a real weapon. A sword is usable in both forms, which is why upgrade money spent there is never stranded for twelve hours of the day cycle.
Two corrections first, because most of the “best weapon” lists circulating for this game describe a different game. There is no silver-versus-steel weapon category, and no source documents a holy damage multiplier of any kind — silver is banned contraband, not a damage type. What actually decides which blade is best is the combat system.
What Actually Decides Whether A Weapon Is Good?
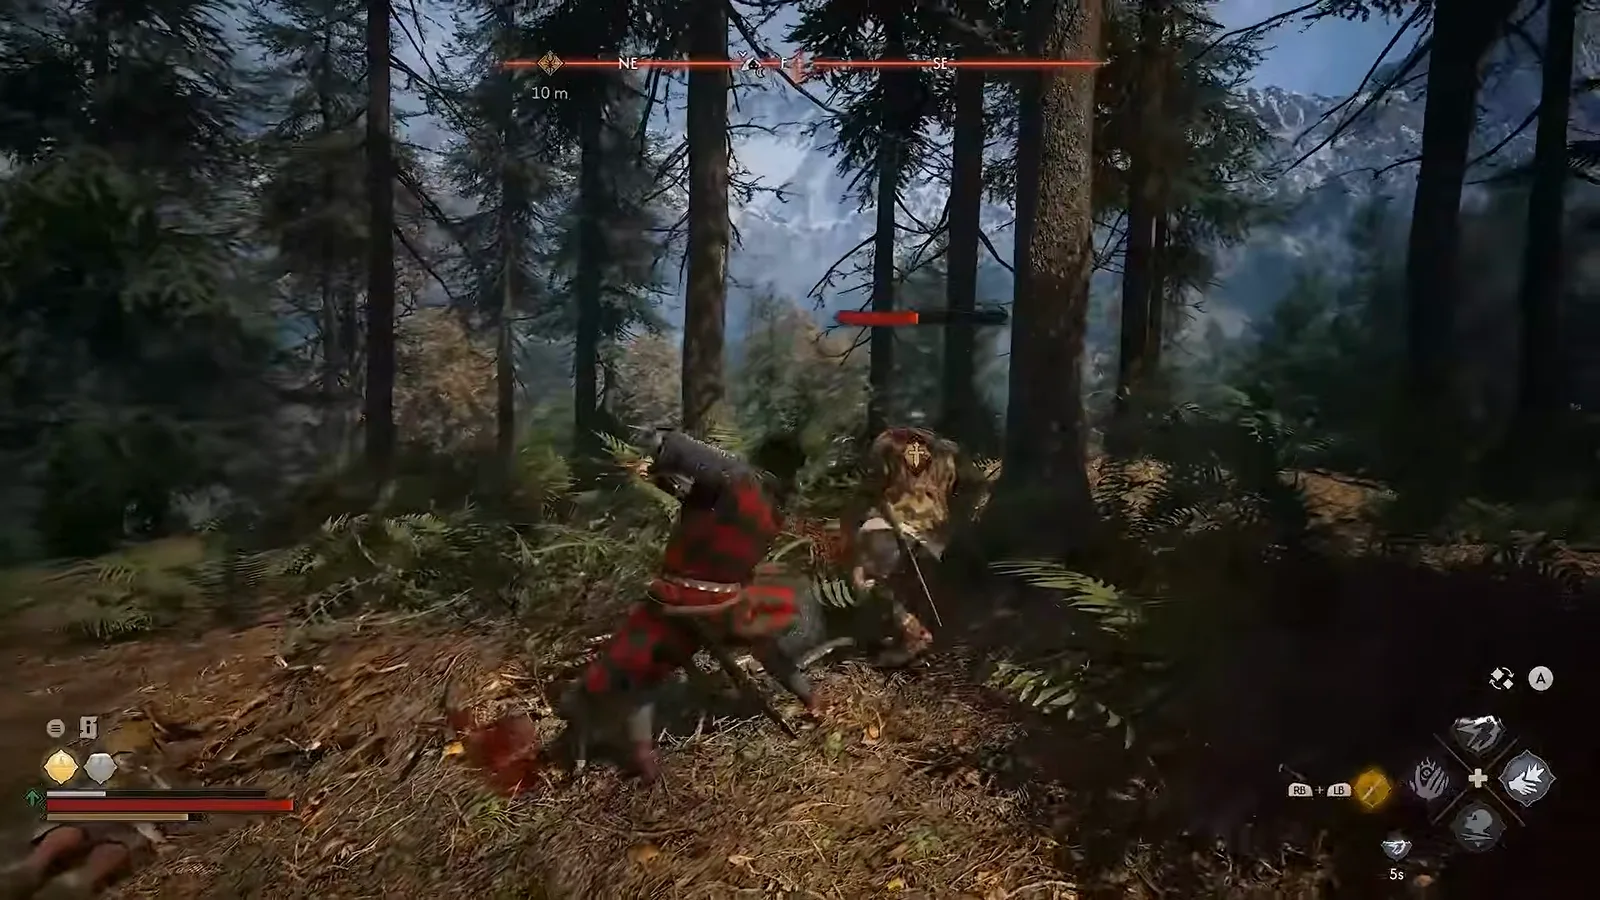
Combat here is four-directional attack and defence. Each incoming strike is telegraphed by a shield-shaped arrow on the enemy’s chest showing which side it is coming from, and you raise your guard on that side. Omni-directional blocking exists but costs more stamina — the safe option is the expensive one. On top of that:
- A normal block drains stamina. A perfect block drains none and creates an opening. Hold the direction you just perfect-blocked and attack, and Perfect Riposte lands as a guaranteed critical.
- Unblockable attacks must be dodged. No weapon choice, no stat, no investment makes them blockable — this is the core discipline of /bosses/brencis/.
- Attacks, blocks and parries fill Activation Charges; at 3 charges the meter turns gold, and your good abilities spend from it (Charge costs 1, Artery Strike costs 2).
Put those together and the ranking rule falls out: the best weapon is the one that keeps you in the block-parry-crit loop without starving your stamina bar. Raw card damage is second-order, because the crit that comes out of a perfect block is what actually kills things — which is why the stamina-focused build in /guides/best-builds/ treats stamina as damage.
What Stats Do Weapon Cards Actually Show?
These are the axes that exist as of patch 1.0.0 — no silver column, no holy column anywhere on the card:
| Card stat | What it is good for |
|---|---|
| DPS | The headline damage number on the card |
| Damage against Mortals | Bonus vs human and beast enemies — the daytime crowd |
| Damage against Supernatural | Bonus vs vampires and other supernatural foes — the real “monster damage” line |
| Attack Stamina Cost | Less per swing = more swings and blocks before you gas out |
| Block Stamina Cost | The stat that decides how long you can hold guard |
| Activation Charge Restoration | How fast you refill the 3-charge meter your abilities spend |
| Armor | Printed on the card; the reason a weapon pick interacts with survivability |
| Max Human Health / Max Vampiric Health | Which of your two forms the item actually keeps alive |
| Vampiric Ability Cooldown | Night-form ability uptime |
For named weapons, specific DPS and percentage values are not documented by the sources verified here — where a single video capture shows a number, we label it as such rather than quoting it as fact.
Which Weapons Are Worth Chasing?
The cross-verified shortlist — names, roles and acquisition all confirmed by at least two sources unless flagged:
- Imbued Sword of St. Mihai — the long quest chain: the cathedral riddles, St. Mihai’s tomb, then Forge It Anew with Uriashi at the Uriashi Hermitage, three Kobold-nest sword shards, and the quenching rite. Reported as heavy Damage against Supernatural with attack-stamina and dodge reductions, and an area weapon art that changes form between day and night. No damage figures are published for it.
- King’s Slayer — buried on the river bank west of Svartrau, reachable straight after the prologue. The defensive pick: reduced Block Stamina Cost, with a larger perfect-block window reported by one capture as +45% — that number is not documented (single video capture).
- Gladius — from The Beast of Balaur: a treasure box in the Balaur cave, reached by climbing the cliff at night in vampire form. Weighted toward Damage against Mortals and Max Vampiric Health.
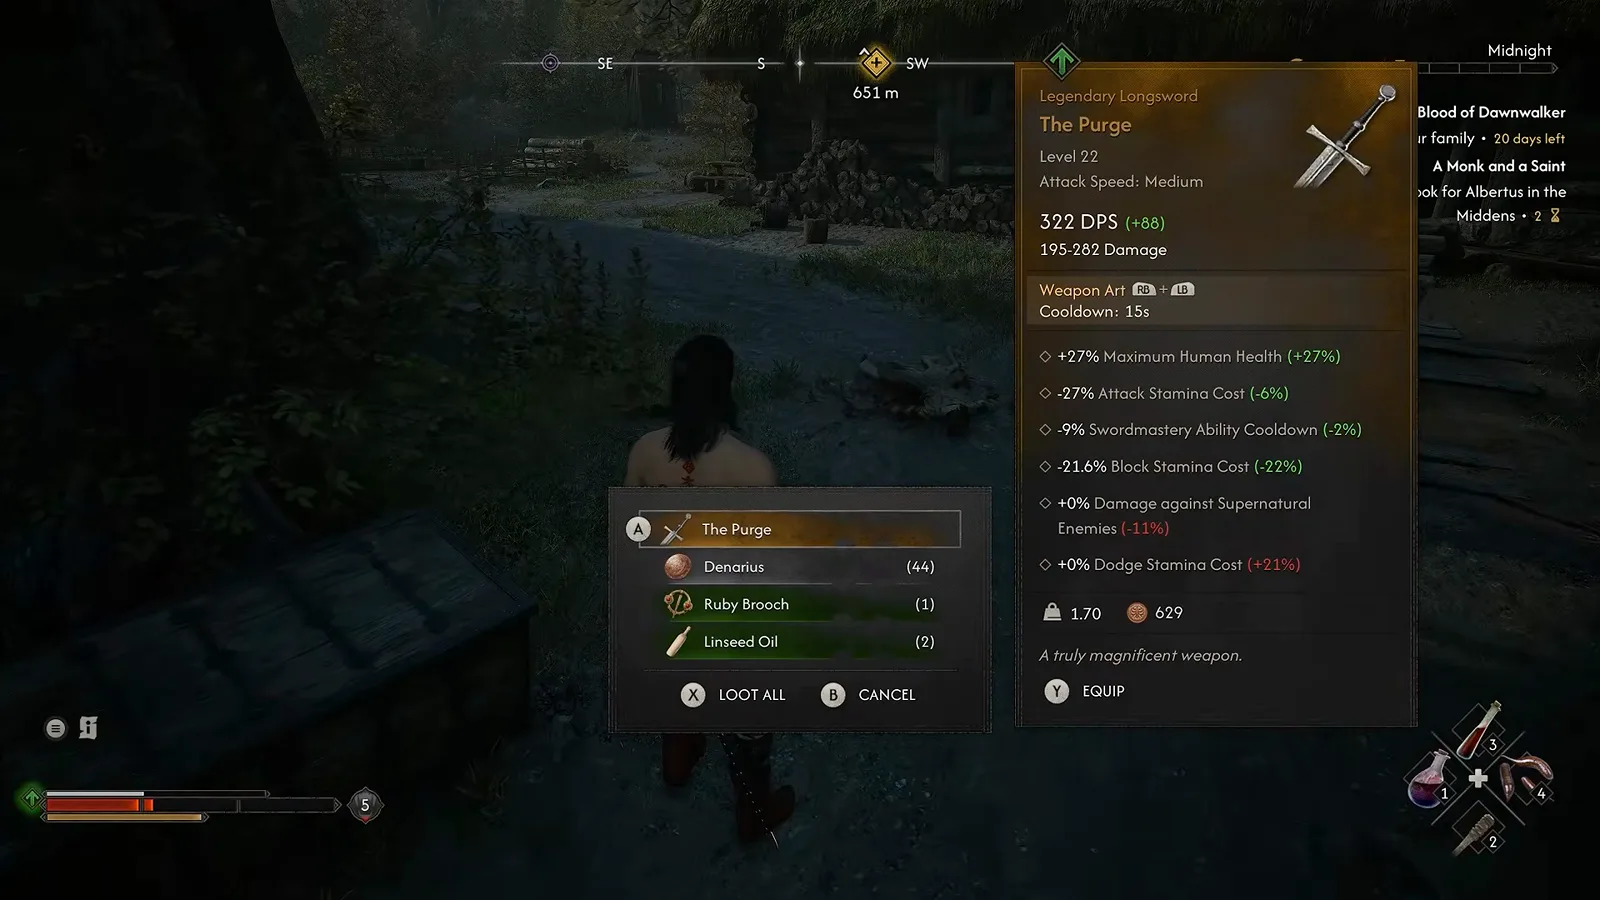
- The Purge — a cross-verified legendary longsword, looted from Bakir’s headhunter camp north of Svartrau or bought from the Silver Trader. Card reads as a survivability stick (large Max Human Health plus attack/block stamina reductions); the DPS and percentage figures floating around come from one on-screen card and are not documented.
- Durandal — cross-verified as a fixed legendary; the quest name attached to it in footage is single-source, so treat the route as unconfirmed.
- Song of Valour — the Level 21 Epic Shortsword /bosses/ambrus/ hands over when he dies, which makes it the first quality-tier reward most runs actually hold.
- Volk’s Sword and Polished Long Cleaver — named in weaker single-source footage; reported as ordinary-tier finds, with no documented stats. Listed here so you can recognise the names, not as recommendations.
Full quest routes, shard locations and riddle answers are on /items/legendary-weapons/.
How Do You Make A Weapon Stronger?
You take it to a person and you pay them. There is no forge, no workbench, and no material chain behind gear progression: weapons and metal armour go to a blacksmith or armourer, and the price rises with the item’s quality tier and Coen’s level, running into the thousands of Denarius late. Documented upgrade contacts: Vera in the Maragir Wealds, the metal craftsworkers of Svartrau, and Uriashi at the Uriashi Hermitage in the northwest Briar Sloughs — the same smith who reforges Saint Mihai’s blade. The step-by-step version, including what is and is not documented about pricing, is in the upgrade guide at /guides/forging-guide/; the consumables side (the only real crafting) is on /items/forging-materials-guide/.
What About Day And Night?
Your weapon choice is really a form question:
| When | Form | What you fight with |
|---|---|---|
| Day | Human | Sword plus Witchcraft; healing comes from spells and consumables only |
| Night | Vampire | Claws (Voracious Bite, Death from Above); the sword comes out only for abilities that require a real weapon |
Quick slots are split 4 daytime + 4 nighttime and the game swaps loadouts automatically with the form. That asymmetry is the whole argument for funding one good sword: Charge applies bleed with claws too, but Artery Strike — the 2-charge finisher — needs the weapon. Route planning around the 30-day clock is covered in /guides/30-day-time-system/.
What Should Not Be On This List?
Names that show up in circulating “best weapon” tables but appear in no official or wiki source for this game: Sunshard Estoc, Nightfall Greatsword, Dawnforged Longsword, Sanguis Dagger, Bastion Silver Broadsword, Militia Shortsword, and every “fine silver blade in the prologue cellar” location attached to them. They are template placeholder content, and the debunked table lives in /guides/weapon-tier-list/.
Sources & Verification
- games.gg — How to upgrade weapons and armor in The Blood of Dawnwalker — vendor upgrades bought with denarius, quality/level price scaling, and the absence of any crafting or resource-farming loop.
- games.gg — The Blood of Dawnwalker beginner’s guide — directional attack and defence, perfect block costing no stamina, the Activation Charges meter, the 4 day + 4 night quick-slot split.
- IGN Wiki — The Blood of Dawnwalker — real weapon-card attribute axes, How to Sell Silver (Silver Trader west of Svartrau), crafting limited to consumables, and the Early Game Skill Tree Guide capture for Perfect Riposte, Charge and Artery Strike.
- PC Gamer — Forge It Anew sword shard locations — the St. Mihai reforging chain and Uriashi as the hermit smith.
- MapGenie — The Blood of Dawnwalker quests & legendary equipment — legendary roster and quest-name cross-check.
- Game8 — The Blood of Dawnwalker Wiki — full legendary table; several fields could not be scraped in this environment and are marked pending manual review (待人工复核) wherever this page defers to it.
- Bandai Namco Europe — official site and gameplay reveal recap — Vale Sangora framing, the day/night form split, and directional combat as shown in first-party footage.
More The Blood of Dawnwalker Weapon Guides
- The ranked table and the debunked weapons: /guides/weapon-tier-list/
- Every quest-tied legendary with its route: /items/legendary-weapons/
- How upgrades and vendors really work: /guides/forging-guide/
- Why silver is a law problem, not a damage type: /items/silver-swords/
- Combat fundamentals this pick depends on: /guides/beginner-guide/ and /guides/skill-trees/
Related Articles
bosses
Echo Boss Guide: The Cursed Chasm & the Durandal Reward
Beat Echo in The Blood of Dawnwalker's Cursed Chasm: the approach, the red-wraith fight, and the full Durandal Legendary Longsword stats from the loot card.
bosses
Forgotten Guardian Boss Guide: the 'Deep Down' Prologue Tomb Fight
Meet the Forgotten Guardian in The Blood of Dawnwalker's 'Deep Down' quest: the tomb rescue, the red unblockable telegraphs to dodge, and what the boss drops.
bosses
Ravenous Bear Boss Guide: Parry, Dodge the Skull, Claim the Liver
Beat the Ravenous Bear in The Blood of Dawnwalker: dodge the skull-marked unblockables, block for free counter hits, and claim the Epic Bear Liver.
Was this helpful?
Thanks for the feedback!