The Blood of Dawnwalker Skill Trees: Witchcraft, Swordmastery, Vampirism
The three real skill trees in The Blood of Dawnwalker: Witchcraft, Swordmastery and Vampirism — node counts, day/night gates, costs and Ultimate Perks.
FAQ
What are the three skill trees in The Blood of Dawnwalker?
How many nodes does each skill tree have?
Can you respec your skill points in The Blood of Dawnwalker?
Where do you actually spend skill points?
What Are the Three Skill Trees in The Blood of Dawnwalker?
Character progression in The Blood of Dawnwalker runs through three trees, and the game itself prints the names across the top of the skill screen: Witchcraft, Swordmastery and Vampirism. They are not three classes — they are three tabs on one character, split by when you are allowed to use them and what else you have to have earned before a node opens.
| Tree | When it is usable | Nodes | What gates it |
|---|---|---|---|
| Witchcraft | Day only (human form) | 31 — 21 perks + 10 abilities | Skill points + manuals; the spells cost Coen’s own HP to cast |
| Swordmastery | Anytime — both forms | 29 — 22 perks + 7 abilities | Skill points + manuals |
| Vampirism | Night only (vampire form) | 30 — 20 perks + 10 abilities | Skill points + Corruption level per node |
Every tree ends in a row the menu labels “ULTIMATE PERKS (only one can be unlocked per Skill Tree)”, with the counter reading “Spend ⚙ to unlock: 1/35” — 35 skill points sunk into whichever of the three you pick, permanently.
What Does Learning a Skill Cost?
Four things, and the skill screen shows them at once. This is the part most guides get wrong:
- Skill points — from XP. The level readout in the top-right of the menu carries the XP bar (e.g. 426/1120 XP) and a gear icon for unspent points.
- A manual — on Witchcraft and Swordmastery nodes, ranks wearing the book badge stay shut until you have found the matching manual and read it. In the Witchcraft Mastery panel below, the first two ranks are plain diamond-marked while the +25% and +40% ranks carry the book badge — the manual requirement made visible.
- Corruption — Vampirism nodes wear a blood-goblet icon and demand a Corruption level, which you raise by drinking blood. There is no separate “unlock quest” for them; the meter is the key. See /guides/vampire-powers/.
- Time segments — some ranks burn part of the /guides/30-day-time-system/ budget on top of the points, the same hourglass currency every Court Activity charges.
All of it happens at a repaired Road Shrine: stand anywhere else and the panel’s action line reads GO TO ANY ROAD SHRINE TO LEARN instead of a prompt.
How to Read the Skill Screen
The icons do all the work, and once you know them you can price any node without a guide:
- Sun / moon tag on a panel header — DAY ONLY is legible on Witchcraft panels and ANYTIME on Swordmastery ones; Vampirism is the night-side counterpart to both.
- Diamond pips under an icon — how many ranks that node has.
- Book badge — a manual is required for that rank.
- Blood-goblet badge — a Corruption level is required (Vampirism).
- Gear — the skill-point price shown on the learn prompt, e.g. HOLD Ⓐ TO LEARN FOR 1 ⚙.
- PERKS column (left) vs ABILITIES column (right) — passives versus the spells and strikes you actually assign.
Passives are not automatic — the Active Abilities tab
Perks that change how the kit behaves are not simply “on” once bought. They have to be equipped in the ACTIVE ABILITIES tab of the character menu, which is a separate screen from the tree. If a passive you clearly bought is doing nothing, that tab is the first place to look.
Swordmastery Tree: The Build That Works in Both Forms
Swordmastery is the only tree usable at any hour and in either form, which is why every recommended build starts here. Named nodes documented by IGN’s First skill-tree coverage and the on-screen panels:
| Node | What is documented |
|---|---|
| Endless Effort | Panel text reads simply “Increases Stamina.” — the stamina pool is the build’s engine; see the note below on why |
| Perfect Riposte | After a perfect block, hold the defended direction and attack for a guaranteed critical hit |
| Charge | 1 activation charge — closes distance, stuns, applies bleed; works with vampire claws, so no weapon swap |
| Artery Strike | 2 activation charges — a single blow at 450% weapon damage with a ~10% instant-kill chance, both scaling with ranks |
| Broad Swing | 2-charge area sweep |
| Sustained Focus | Grants an extra activation charge |
| Second Skin I / II | Removes the stat penalty for wearing medium (I) and heavier (II) armour below your level |
| Walking Fortress | Named in IGN’s skill-tree coverage; effect not documented by the sources verified here |
| Master Fencer | Named node; effect not documented by the sources verified here |
| Sharp Eye | Named node; effect not documented by the sources verified here |
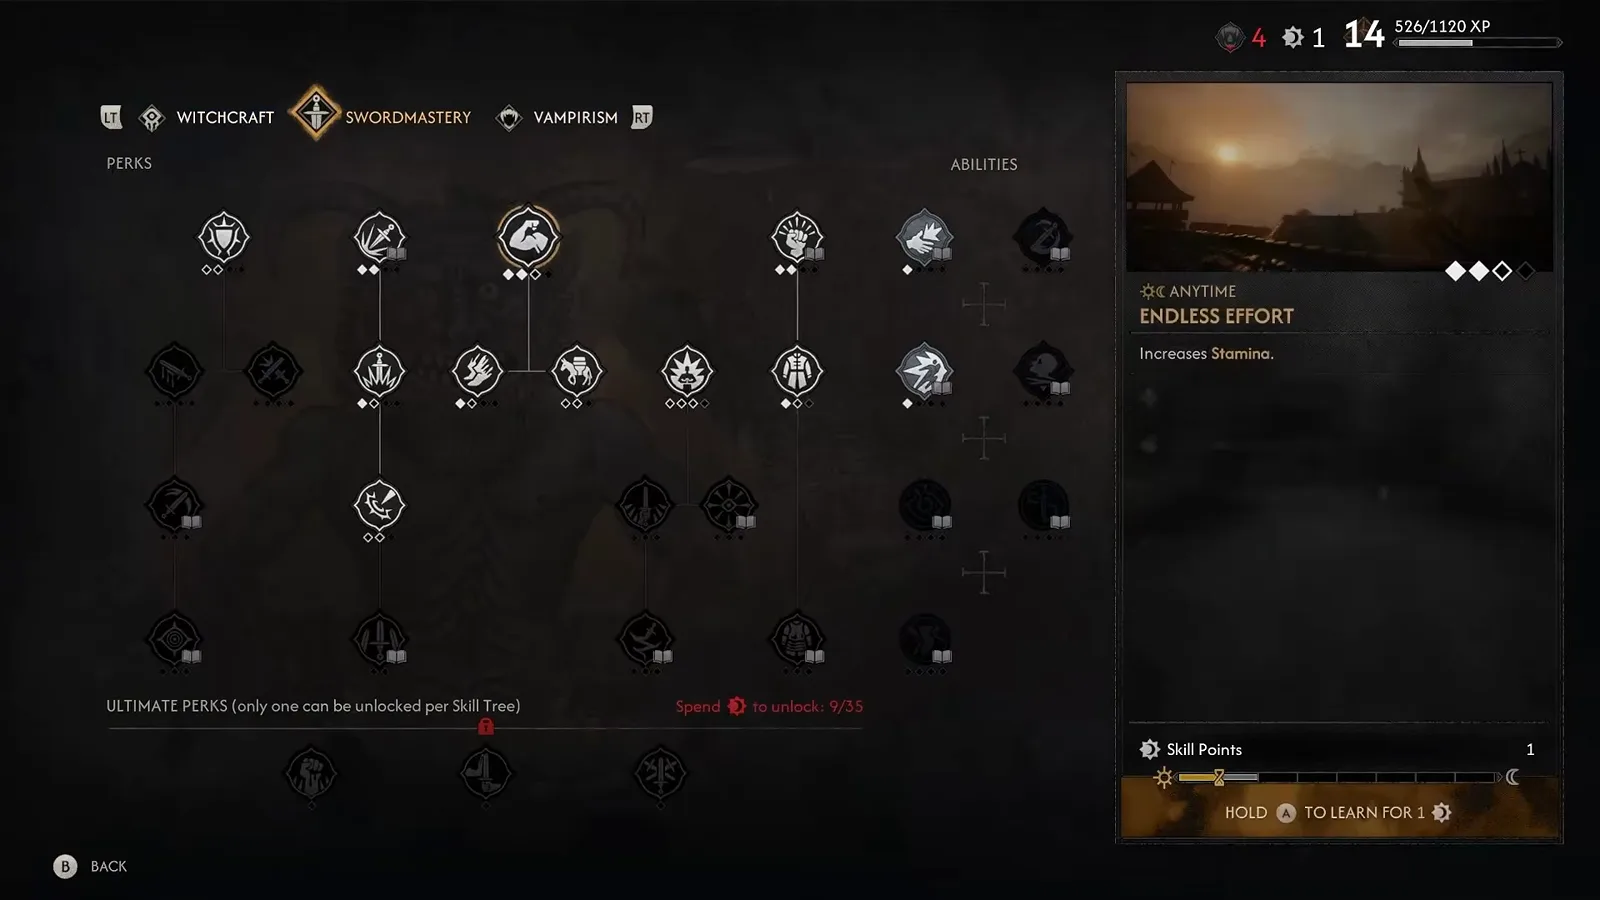
Swordmastery’s header tag reads “ANYTIME” — the tree that carries across the form swap. Full rank-by-rank build order is on /guides/best-builds/.
Witchcraft Tree: Day-Only Spells Paid for in Health
Witchcraft is Coen’s human-side toolkit, and its defining rule is the one people misread: the spells consume his own HP, because daylight Coen has no other healing loop (see the combat section). Day-only gating is printed on the panels themselves.
| Node | What is documented |
|---|---|
| Witchcraft Mastery | On-screen perk: “Witchcraft Abilities deal more Damage.” Ranks scale +15% → +40%, with the top rank adding a 100% chance of 176 extra damage on a Witchcraft hit; the upper ranks are manual-gated |
| Ravenous Flock | Named in IGN’s First skill-tree coverage as one of Witchcraft’s headline abilities; exact effect and numbers not documented |
| Astral Communion | Has real-world utility, not just damage: it is the documented way to light the pillars during The Bittersweet Toast chain on the way to /bosses/ambrus/ |
| Unholy Vitality | Named node; effect not documented by the sources verified here |
| Compel Soul | Named node; effect not documented by the sources verified here |
| Burning Blood | Named node; effect not documented by the sources verified here |
| Forager | The harvesting talent — it improves what you pull out of the world when gathering crafting reagents (cross-reference /items/forging-materials-guide/) |
| Medicus I / II | Named ranks of the tree’s medicine line; exact effect not documented by the sources verified here |
| Haste / sprint spell | The bottom-right Witchcraft ability that lets human Coen sprint at superhuman speed — our build guide names it Haste, the form guide calls the same tool Rush; both describe one node |
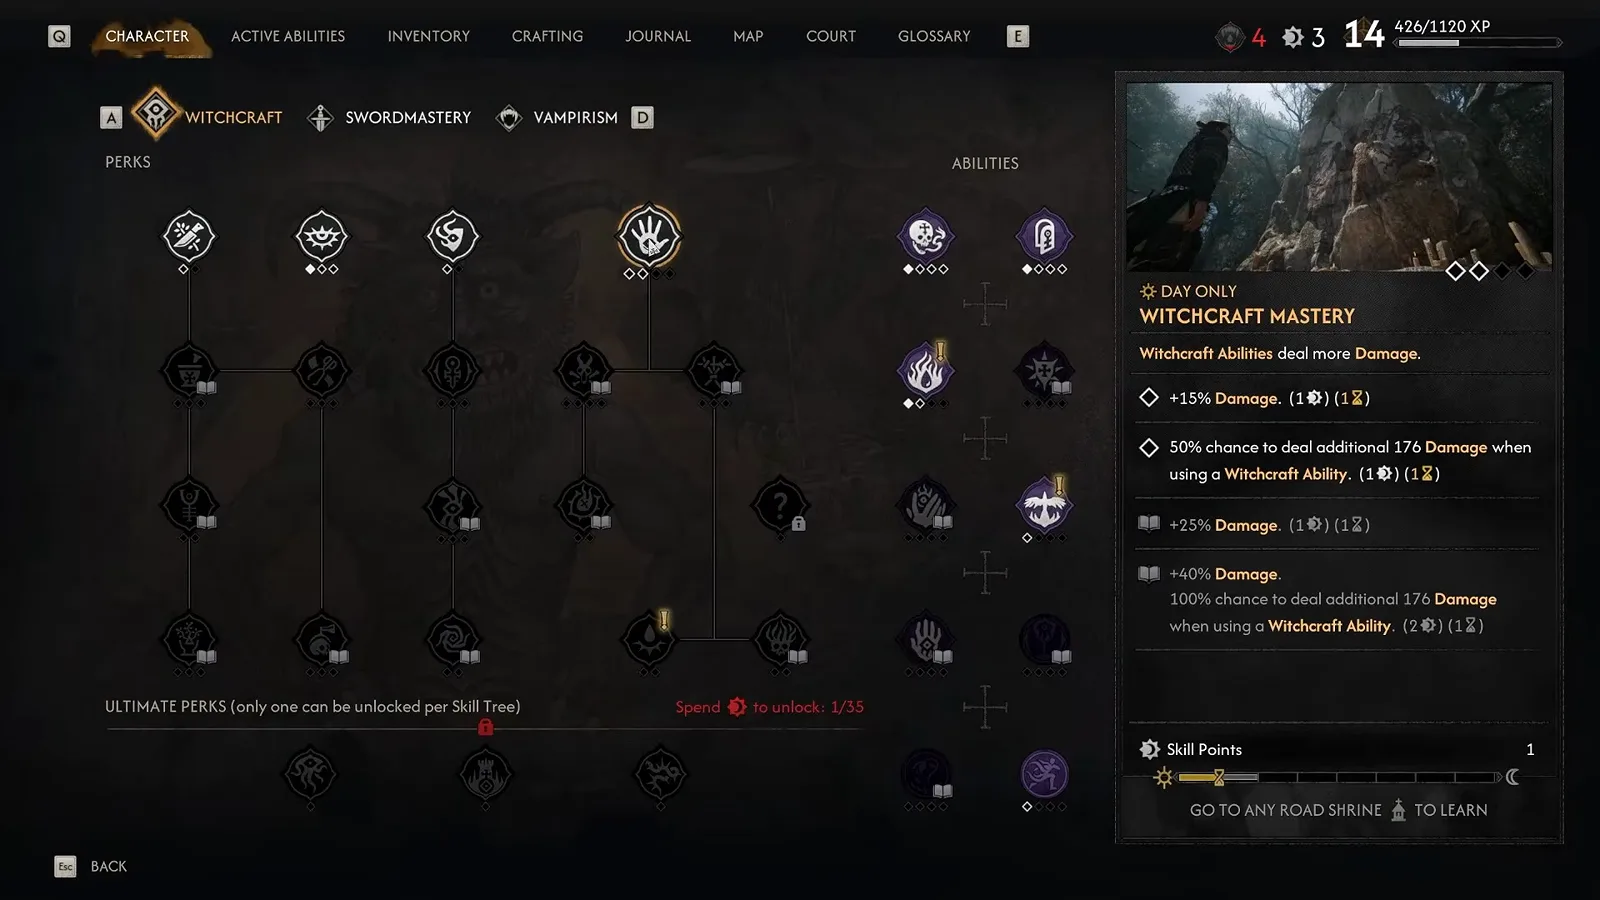
Note the “GO TO ANY ROAD SHRINE TO LEARN” line at the bottom — you cannot bank a purchase from the field menu.
Vampirism Tree: Night Powers Locked Behind Corruption
Vampirism is the night half of the character: claws, feeding, movement, and the abilities that need the vampire form. Its nodes carry the goblet badge, so feeding is the unlock currency, not quest completion.
| Node | What is documented |
|---|---|
| Voracious Bite | Teleports behind a target, drains their health and restores his own — the night form’s main heal; take ranks early |
| Death from Above | Uninterruptible plunging strike; one-shots ordinary enemies from height and is the recommended damage boost for boss fights such as /bosses/ambrus/ |
| Shapeshift | The wolf transformation — night travel at the same top speed as the human sprint spell, gated behind Corruption level 1 |
| Shadowstep | Vampire mobility used for vertical traversal — it is the documented way up the cathedral scaffolding in the /bosses/xanthe/ encounter |
| Planeshift | Named in Bandai Namco’s gameplay reveal as a vampire repositioning ability; exact effect not documented here |
| Clawride | Named in Bandai Namco’s gameplay reveal; exact effect not documented here |
| Piercing Shriek | Reported by the build captures as a stun that then reflects a portion of incoming damage for a window (percentages unverified); it is also the reward for drinking the Phial of Brencis’s Blood from /bosses/xanthe/ |
| Blood Surge | Named in IGN’s skill-tree coverage; exact numbers not documented |
| Crimson Rush | Named node; effect not documented by the sources verified here |
| Mercurial Fervour | Named node; effect not documented by the sources verified here |
| Rebound Death (Ultimate) | The tree’s Ultimate Perk: a lethal hit is converted into temporary immortality with lifesteal instead of death |
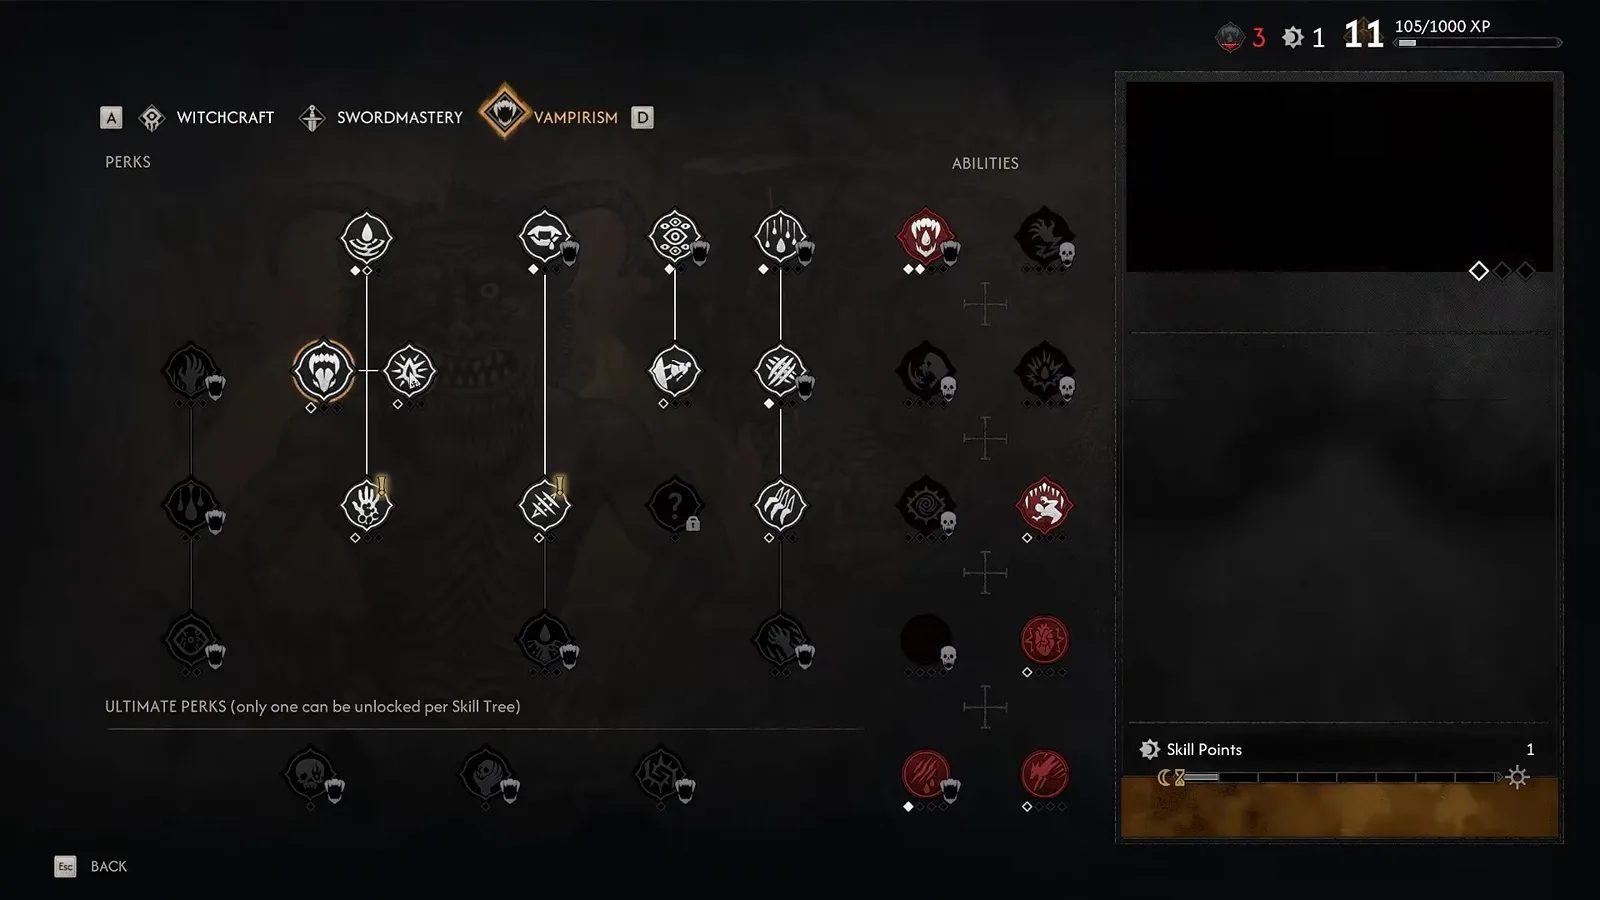
Red icons = Vampirism. The goblet badge on a node is a Corruption requirement, which is why feeding is progression.
How the Combat System Shapes Every Node
A skill tree is only worth what the fight lets you do with it. The documented combat skeleton these nodes plug into:
- Four-directional attack and defence. You block and strike from a specific side; the on-screen prompt tells you which. Omni-directional block and attack exist too, but cost extra stamina — the “safe” option is the expensive one.
- A normal block drains stamina; a perfect block drains none and creates an opening. That asymmetry is the whole reason Perfect Riposte is the core of every build: perfect-block a red-shielded attack, hold that direction, and the follow-up is a guaranteed critical.
- Unblockable attacks must be dodged. No amount of investment makes them blockable — bosses like /bosses/brencis/ lean on this.
- Activation Charges. Attacks, blocks and parries fill a charge meter; at 3 charges it turns gold, and several abilities additionally require charges to fire (Charge = 1, Artery Strike = 2). Sustained Focus adds another charge to the meter.
- 8 quick slots: 4 daytime + 4 nighttime. Witchcraft slots are purple (day), Vampirism slots red (night), Swordmastery slots grey (both). You carry two loadouts, and the game swaps between them automatically when the form changes.
- Healing is asymmetric. By day, human Coen heals only through spells and consumables; by night, feeding does it. This is the hidden reason Witchcraft burns HP — it is a resource-management choice, not a flat tax.
Which Nodes to Take First
The order that both verified captures converge on — the full reasoning lives on /guides/best-builds/:
- Endless Effort (Swordmastery) — stamina is DPS here; run out and you stop blocking.
- Perfect Riposte (Swordmastery) — converts defending into critical damage.
- Charge then Artery Strike (Swordmastery) — the two activation-charge slots.
- Voracious Bite (Vampirism) — night survivability, ranked up as soon as you can.
- Sustained Focus and Second Skin I (Swordmastery) — a third charge and painless medium armour.
- Death from Above (Vampirism) — the closest thing this game has to a stealth takedown.
What Is Still Not Documented
- Respec — no authoritative source confirms or denies a refund mechanic; this page treats points as permanent.
- Full node lists — 90 nodes across three trees; only the names above are attested by a source we could verify. Everything else is left as “not documented” rather than filled in.
- Per-rank numeric costs — how many skill points and how many time segments each individual rank burns is not published in a complete table anywhere we could check.
- The other two Ultimate Perks per tree — only Rebound Death (Vampirism) is named; the Witchcraft and Swordmastery ultimates are not documented by the sources verified here.
Sources & Verification
- Bandai Namco Europe — The Blood of Dawnwalker official site — the three-tree framing and the day/night form split the trees hang on.
- Bandai Namco Europe — The Blood of Dawnwalker gameplay reveal recap — names Shadowstep, Clawride and Planeshift as vampire abilities in shown footage.
- IGN First skill-tree coverage (via IGN’s The Blood of Dawnwalker hub) — the three official tree names, the 21/10, 22/7 and 10/20 node split, the Corruption gate on Vampirism, and the named nodes Ravenous Flock, Blood Surge and Walking Fortress.
- games.gg — The Blood of Dawnwalker beginner’s guide — perfect block costing no stamina, the 4 day + 4 night slot layout, the Activation Charges meter, and the absence of a crafting-table loop.
- The Blood of Dawnwalker — Early Game Skill Tree Guide by IGN — the on-screen panels reproduced as screenshots on this page (Witchcraft Mastery ranks, Endless Effort’s ANYTIME tag, the Vampirism goblet badges, the GO TO ANY ROAD SHRINE TO LEARN prompt and the 1/35 Ultimate counter), plus the Charge / Artery Strike / Perfect Riposte / Second Skin effects.
- Rock Paper Shotgun — how to defeat Ambrus — Astral Communion as the pillar-lighting utility and Death from Above as the boss-damage pick.
More The Blood of Dawnwalker Guides
- The build these picks add up to: /guides/best-builds/
- The night kit in detail: /guides/vampire-powers/
- The clock your skill ranks draw down: /guides/30-day-time-system/
- Gear that beats free stat points: /guides/best-weapons/ and /items/legendary-weapons/
- Difficulty settings that change how punishing a bad build is: /guides/difficulty-settings/
Related Articles
items
The Blood of Dawnwalker Swordmastery Manuals: Locations & How They Work
How Swordmastery Manuals work in The Blood of Dawnwalker: what they unlock, where to find them in camps and from vendors, and the real cost of each rank.
guides
The Blood of Dawnwalker Corruption Build: Level Vampirism Fast
A corruption-focused Vampirism build for The Blood of Dawnwalker: how to raise Corruption fast with Voracious Bite, what it unlocks, and what stays undocumented.
guides
The Blood of Dawnwalker Best Builds: Day Sword, Night Vampire, Witchcraft
The best early-to-mid build in The Blood of Dawnwalker: a stamina-fuelled Swordmaster core, Perfect Riposte crits, Vampirism claws and Witchcraft ranged damage.
Was this helpful?
Thanks for the feedback!