The Blood of Dawnwalker Court Activities: Anger, Infamy & the Generals
Learn how court activities work in The Blood of Dawnwalker: raid outposts and distilleries to raise each general's anger, unlock boss fights, and manage infamy.
FAQ
Where is the Court menu in The Blood of Dawnwalker?
How do you unlock a fight with one of Brencis's generals?
Do court activities cost time?
What happens when Coen's infamy rises?
What Are Court Activities in The Blood of Dawnwalker?
Court activities are the daytime operations that let Coen take the fight to Brencis without ever storming his castle head-on. Beneath Brencis sit three generals — Ambrus, Bakir and Xanthe — each running the valley through a web of outposts, supply lines and places of control. The Court screen (the COURT tab in the pause menu) is where you track the work of dismantling all three, and everything you do there feeds two meters at once: each general’s anger, and Coen’s own infamy.
This page is about what you actually do during the day and what it unlocks. For the underlying clock — how many segments a day holds and what spends them — see the /guides/30-day-time-system/; the court is where that budget gets spent on the campaign’s spine.
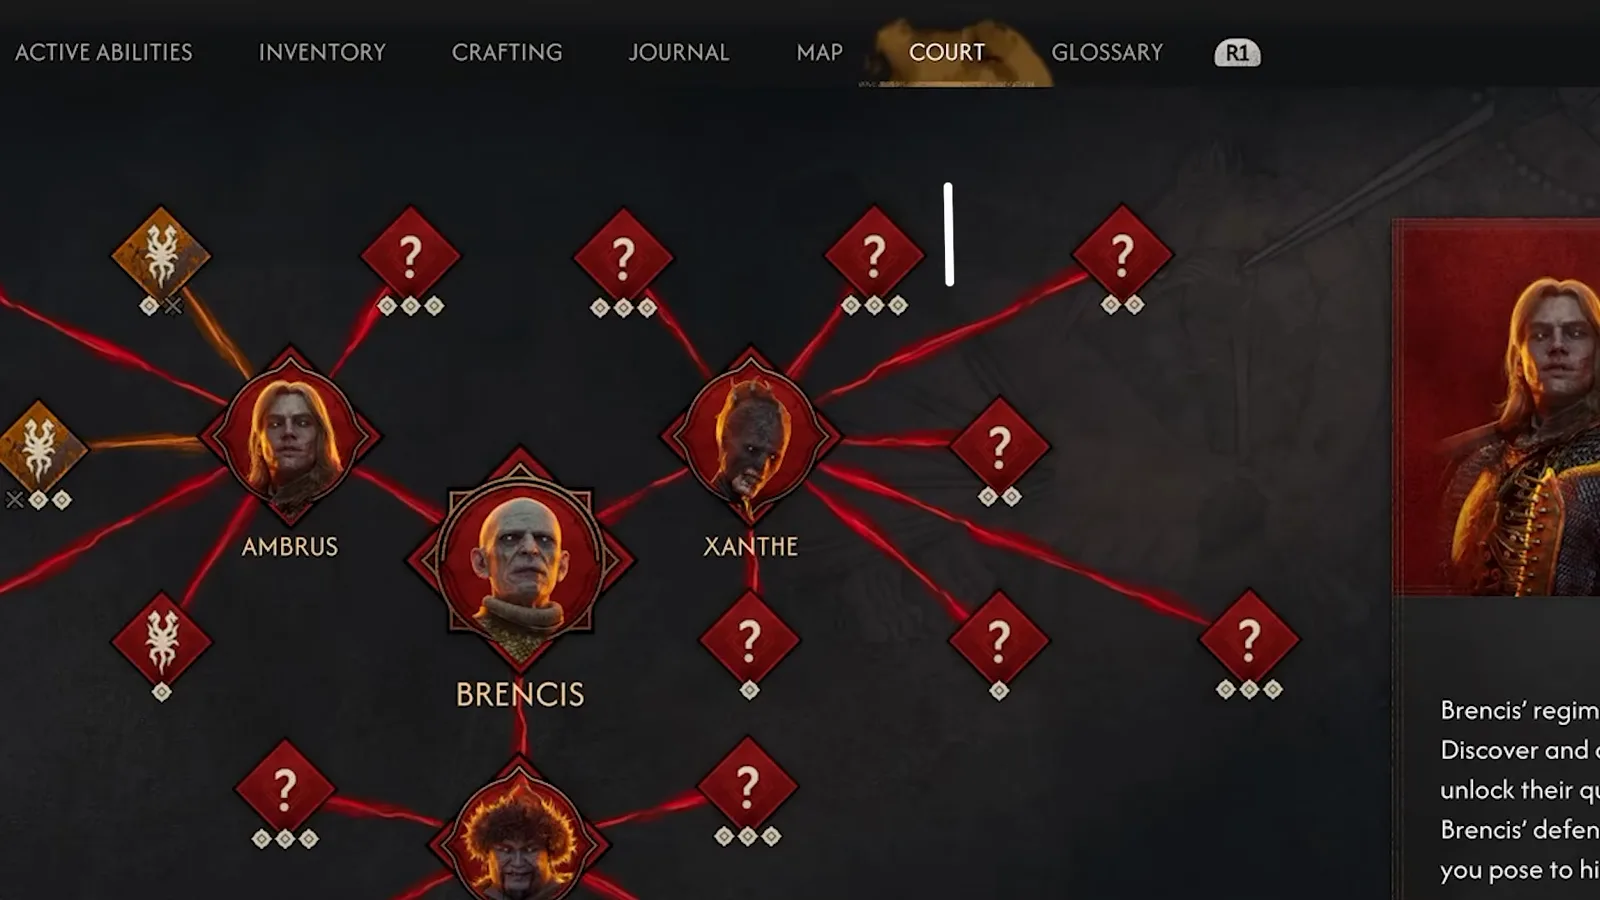
The Court tab sits in the same top bar as Journal and Map — this is your operations board for the whole campaign. Watch the court screen at 0:20
How the Court Screen Works
The Court screen is drawn as a red node web. Brencis anchors the centre; each general’s branch radiates out from it, and the small diamonds on a branch are its activity nodes. Two things make the screen readable at a glance:
- The dots under a node tell you how many activities that node needs — one, two or three. IGN’s system primer is explicit that “each question mark will have one, two, or three dots that signify how many activities need to be completed for that specific node.”
- The node’s colour tells you its state. A node you have started turns gold; a node whose activities are all finished turns grey, meaning that operation is fully dismantled for that general.
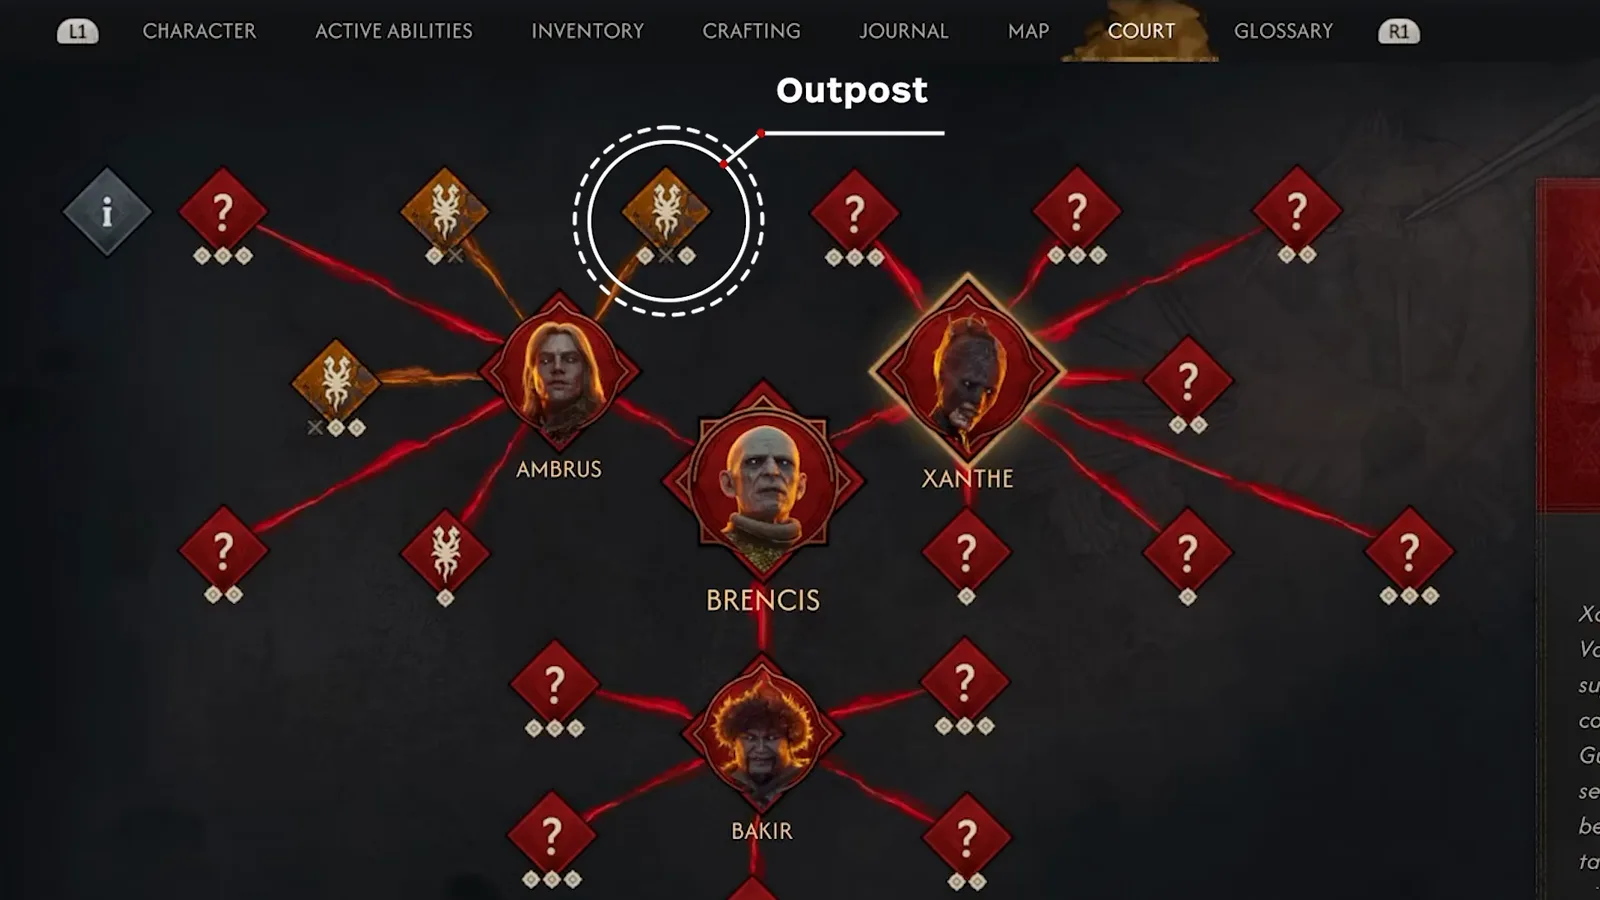
Hover a node to see what kind of operation it is before you commit time to it. See the Outpost node at 0:35
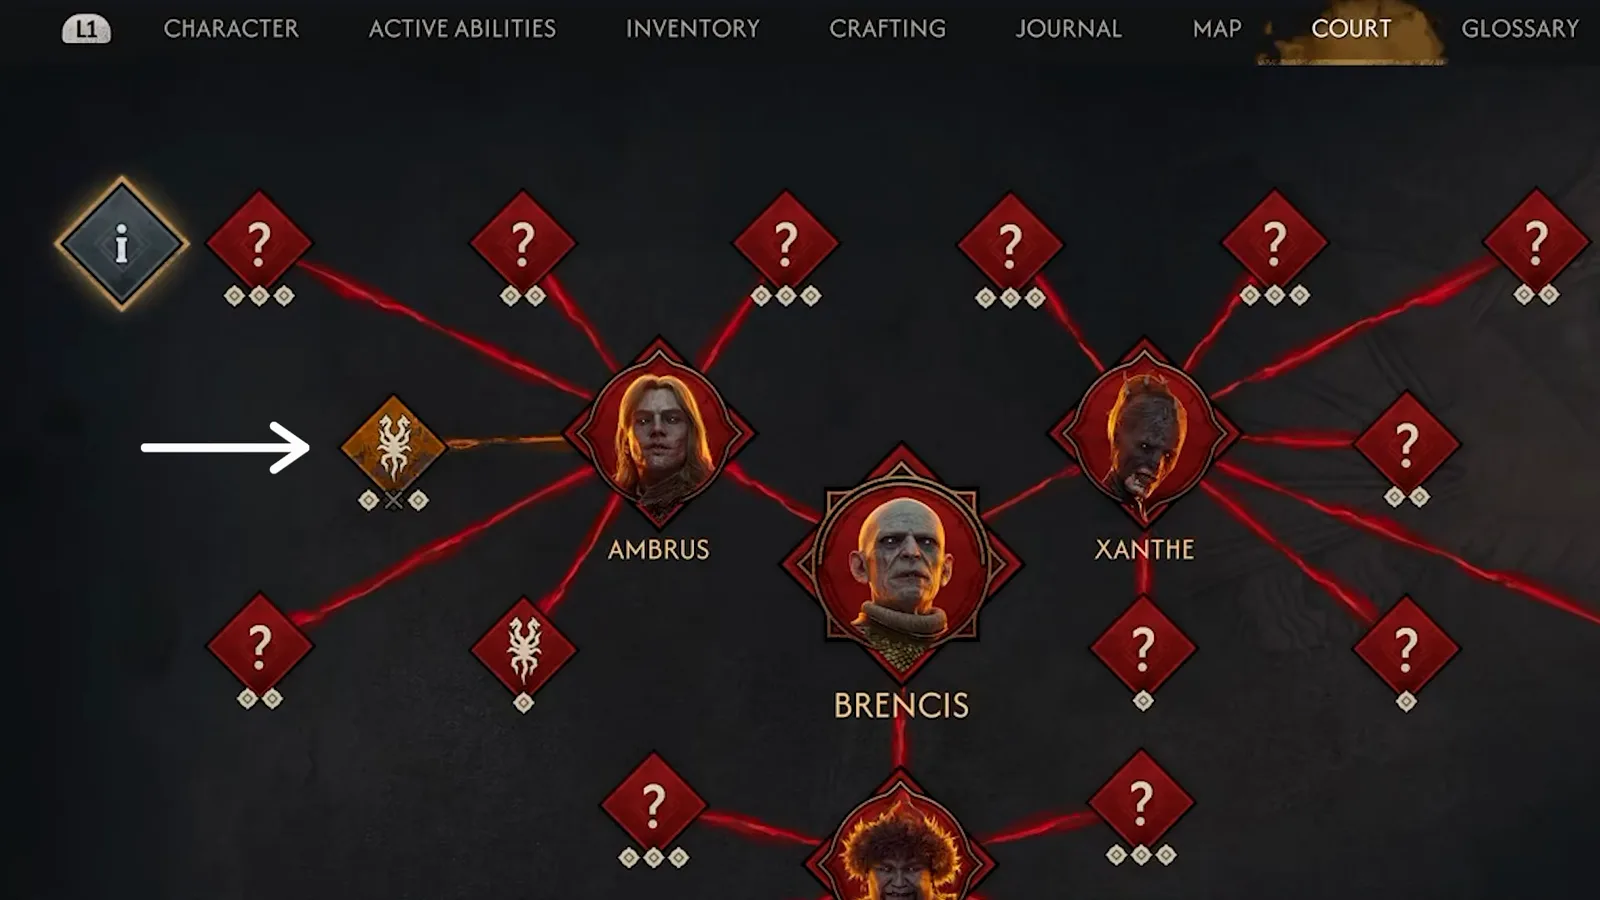
Gold means in progress — the node is active but not yet finished. The gold node at 0:50
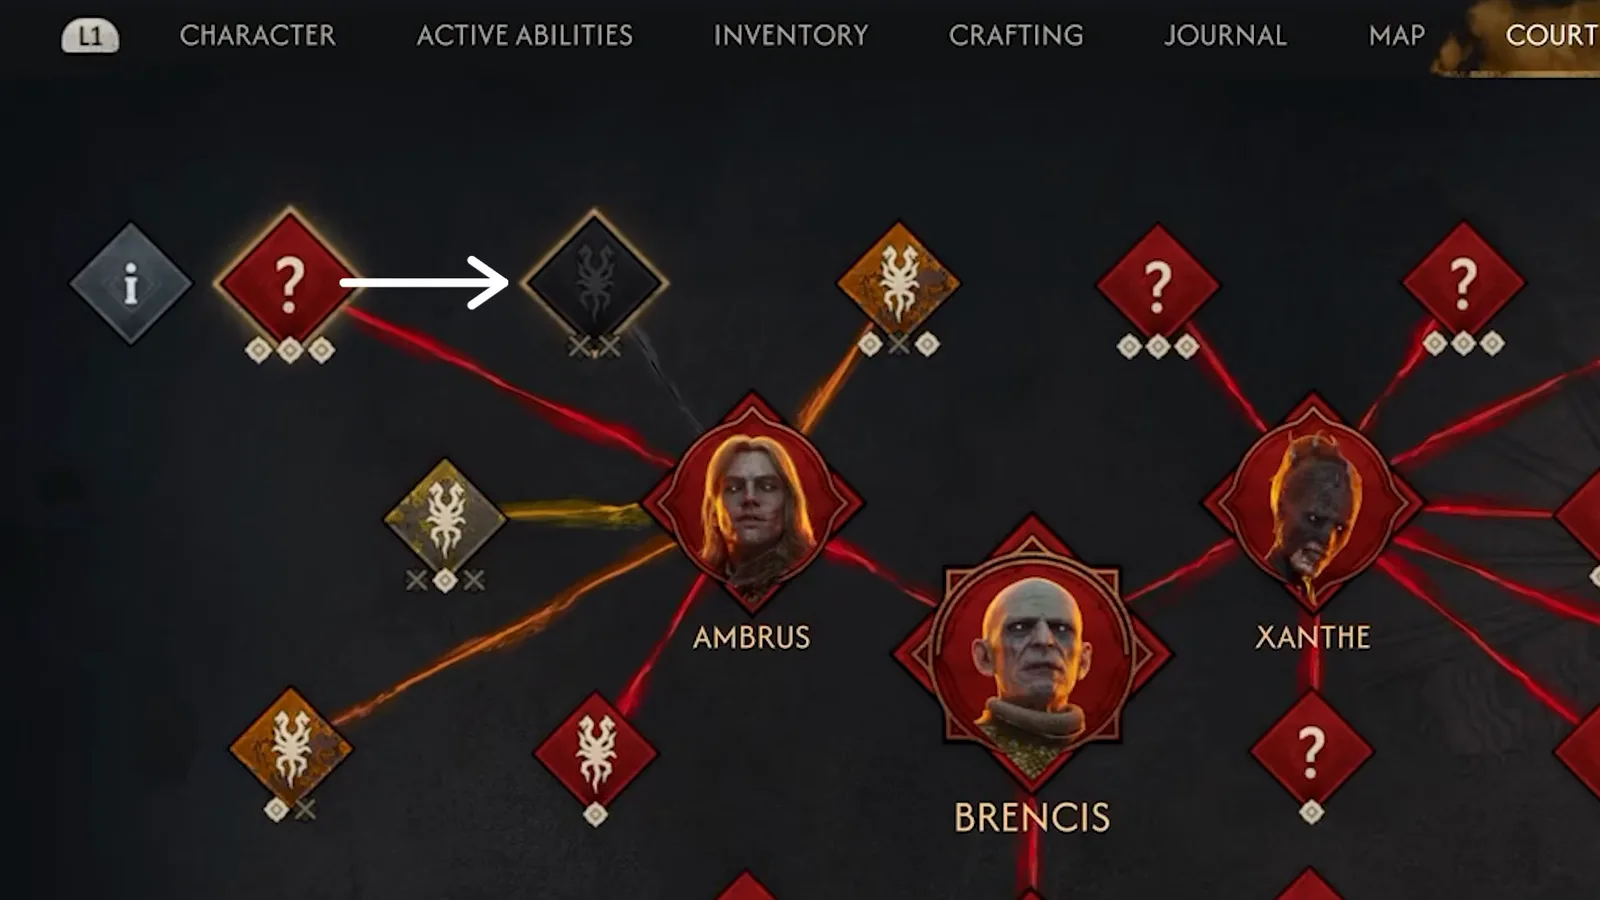
Grey means done: that specific operation no longer exists for the general who ran it. The greyed node at 1:00
What Activities Count for the Court?
The Court screen does not invent its own minigames — it tracks the operations you resolve out in the world. IGN names the recurring types directly: raiding outposts, destroying blood-storage barrels, and smashing the distilleries used to control the populace. Each of those, once located, appears as a node on the relevant general’s branch, and finishing its activities is what moves the meters.
Walkthrough captures of Bakir’s court group his operations into named clusters — headhunting parties, transport convoys, the distilleries, and the pillories — which lines up with the “distillery” and “outpost” activity types the system primer describes. Treat those clusters as the flavour of one general’s branch, not a universal checklist: only what a capture actually shows is documented here.
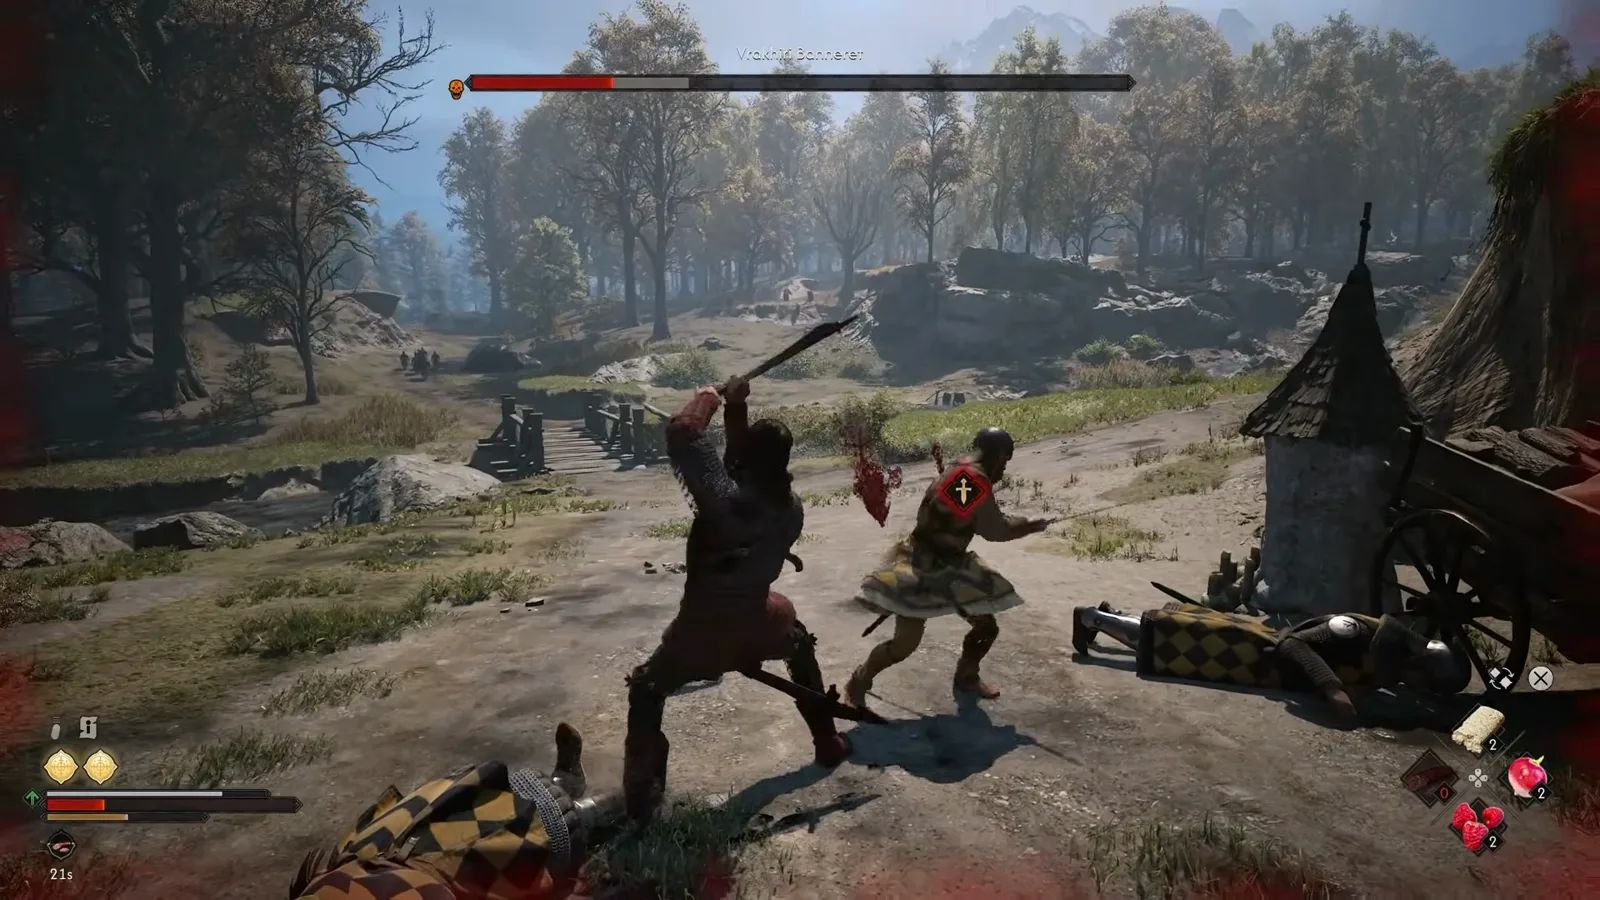
Most court activities resolve as a daytime fight or interaction at a marked location. Daytime camp action at 1:30
How Activities Raise Anger and Unlock Each General
Every operation you dismantle on a general’s branch pushes their anger up. Max it out and a new quest opens giving you an audience with that warlord — the boss encounter. The game’s own dossier text states the rule plainly: when a general’s anger level reaches maximum, you unlock the audience.
That loop is the strategic heart of the day. Completing a general’s chain does three things at once: it weakens them for the fight, it hands you moral choices that ripple into the story, and it brings Brencis one lieutenant closer to falling. Because anger only builds through activities that cost time, which general you provoke first is a real budgeting decision — see /guides/one-playthrough-faq/ on why you cannot max all three in a single run.
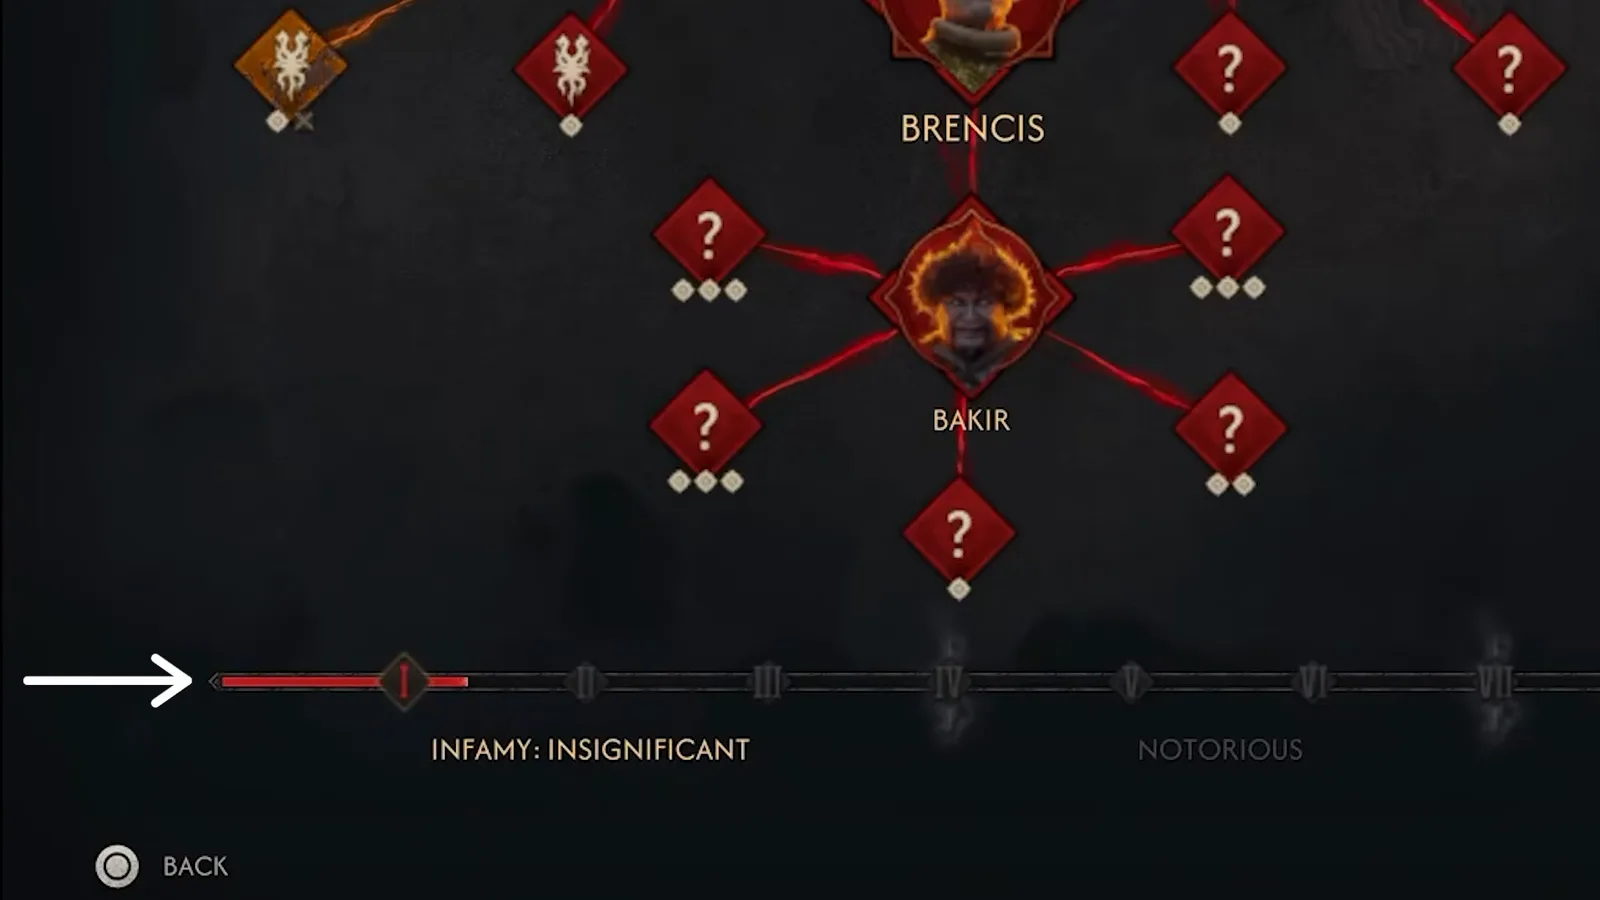
Each general’s branch is its own anger ladder — clear the nodes to earn the audience. Bakir’s branch at 1:25
Infamy, Edicts and the Cost of Going Loud
Wrecking the court is loud, and Brencis is listening. Along the bottom of the Court screen runs a red awareness gauge — Coen’s infamy — climbing through the ranks Insignificant → Notorious → Dreaded. Filling it is not a fail state; it is a consequence economy with two sides.
The downside: crossing the gauge’s checkpoints alerts Brencis, who responds with edicts. The captured edict card “On Protection of Habitations” announces additional armed patrols in settlements — the “more frequent enemy patrols” the system primer warns about — and RageGamingVideos notes that hitting higher infamy thresholds also raises merchant prices across the game. The upside: those same thresholds open extra quest chains, so a high-profile Coen unlocks content a cautious one never sees.
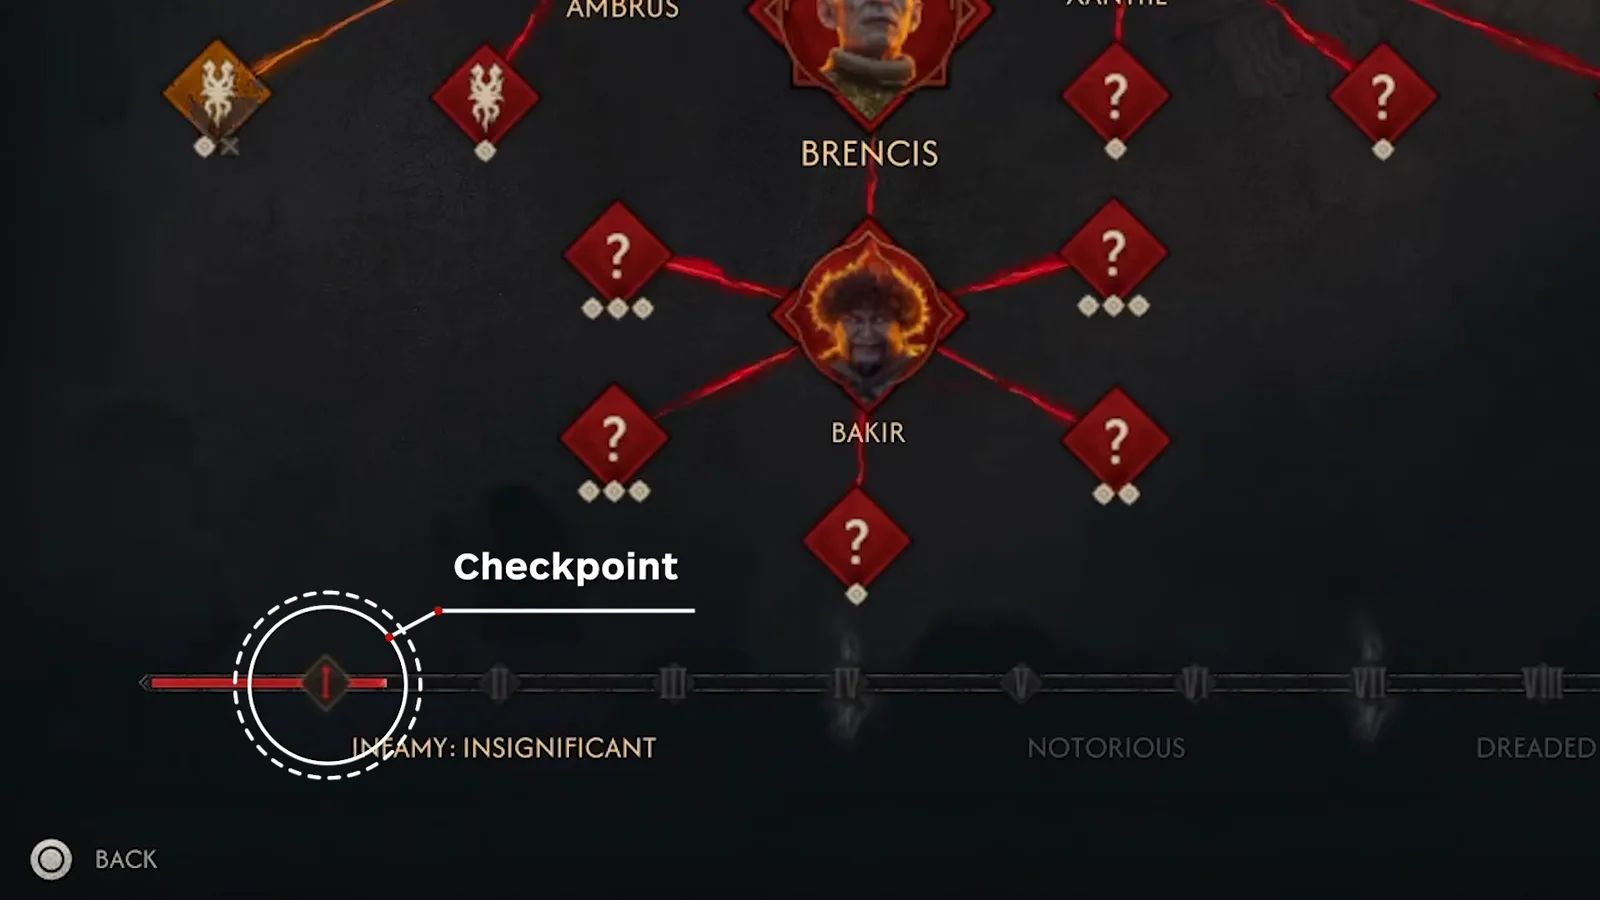
The checkpoints on the infamy bar are where Brencis starts reacting to you. The checkpoint callout at 1:38
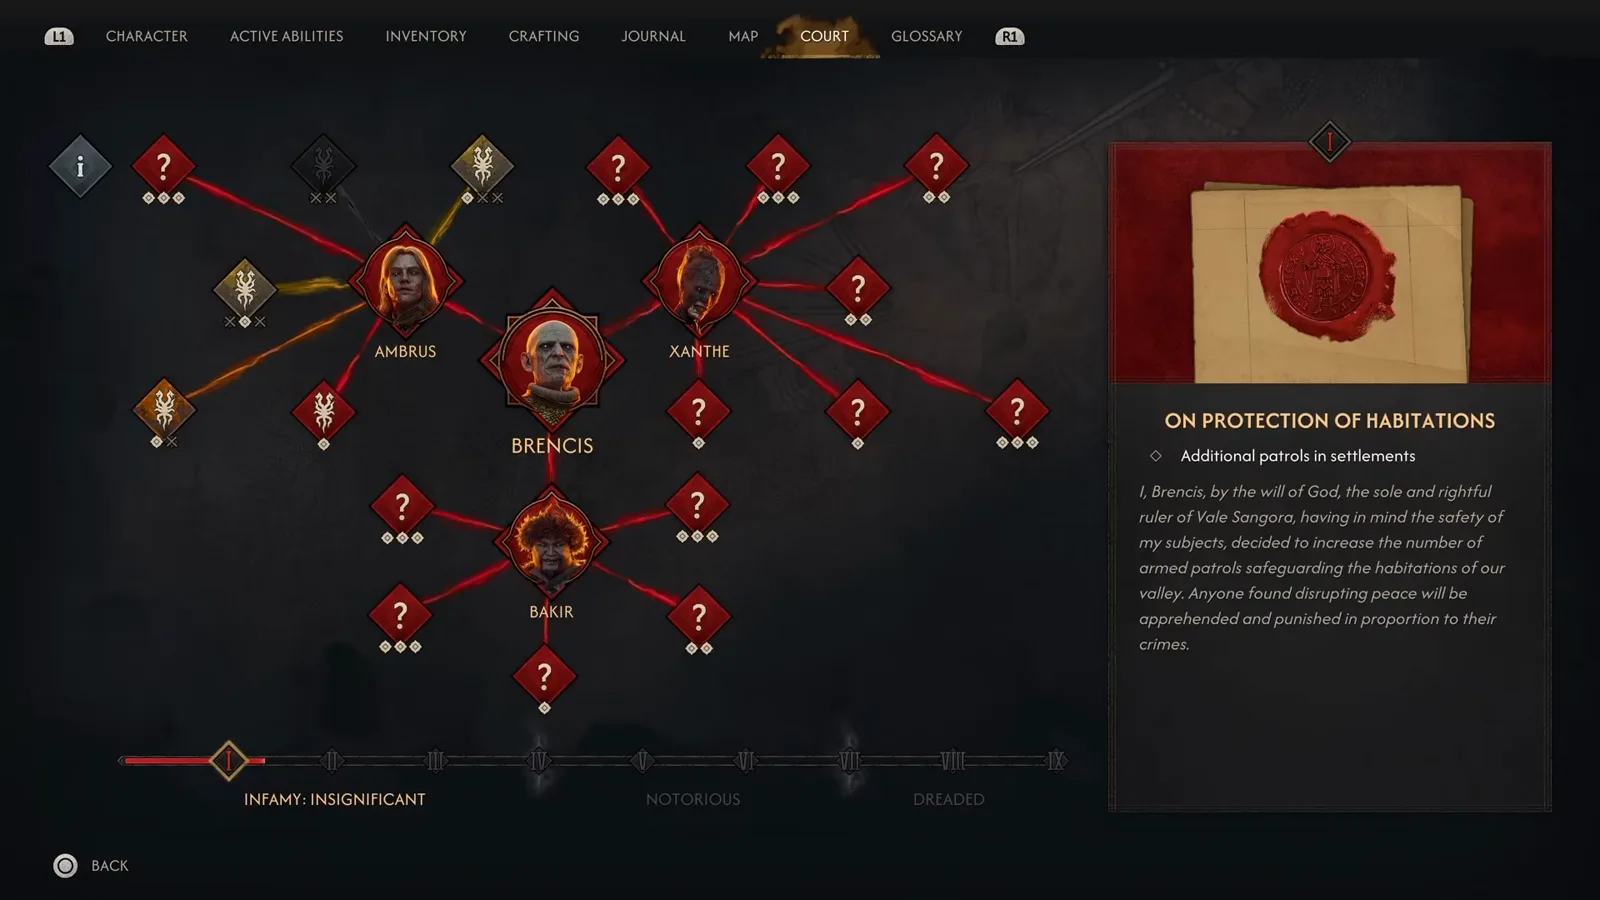
Edicts are Brencis’s counter-pressure: read them as a signal of how much heat you have drawn. The edict card at 2:08
Do Court Activities Cost Time?
Yes — and this is the part most players misjudge. Time in The Blood of Dawnwalker is a fixed resource, not a ticking clock: each day and each night are split into eight time segments, with a hard campaign budget, and every activity spends segments. The important nuance from the time guides: walking to a node is free. You only pay when you resolve the activity, and the game always flashes the time icon and plays a cue before spending, so you can bail and pick a cheaper task instead.
Because the court competes for the same budget as everything else, an activity is worth doing only if its anger/infamy payoff beats the alternative. Cross-check the /guides/missable-quests/ list before committing a day to one branch.

The Blood of Dawnwalker — Court System Explained (IGN)
Sources & Verification
- The Blood of Dawnwalker — Court System Explained by IGN — the primary source for the Court screen, the three generals, node dots, gold/grey states, anger-to-audience unlock, the infamy gauge and edicts. All screenshots on this page are captured from this video (see the court web at 0:20 and the edict card at 2:08).
- 10 Things You NEED to Do First by IGN — confirms Ambrus, Bakir and Xanthe as Brencis’s three vassals and that the “court section of the pause” tracks your path to each.
- Get the PERFECT Start — Time Warning by RageGamingVideos — time-as-fixed-budget, per-day segment costs, the map-legend activity list, and infamy raising merchant prices.
- Beginner Guide — Things I Wish I Knew Sooner by Spectral Life — “time is a currency, not a countdown”, eight segments per day/night, walking costs nothing.
- All Bakir Court Activities — FULL GUIDE by WoW Quests — gameplay capture of Bakir’s operation clusters (headhunters, transports, distilleries, pillories); used as a fact source only, its frames carry burned-in chapter labels and are not reproduced here.
More The Blood of Dawnwalker Guides
- The clock every activity draws down: /guides/30-day-time-system/
- Who you can win over in the courts: /guides/romance-options/
- Where the story branches end up: /guides/all-endings/
Related Articles
guides
The Blood of Dawnwalker Best Builds: Day Sword, Night Vampire, Witchcraft
The best early-to-mid build in The Blood of Dawnwalker: a stamina-fuelled Swordmaster core, Perfect Riposte crits, Vampirism claws and Witchcraft ranged damage.
guides
Blood of Dawnwalker Companions: Anca, Lacra & Crake Explained
Every companion in The Blood of Dawnwalker — Anca, Lacra, and Crake (Marat): how you recruit each, what their questlines do, and how they shape the endings.
guides
The Blood of Dawnwalker Difficulty Settings: All 4 Presets Explained
A breakdown of all four difficulty presets, the custom sliders, and the Duelist-run trophy in The Blood of Dawnwalker.
Was this helpful?
Thanks for the feedback!